Are you thinking about adding engineered wood floors to your home? Congratulations, it’s a great choice.
There are so many reasons to love engineered wood flooring:
- It’s beautiful
- It’s durable
- It’s easy to maintain
- It comes in many styles and colors
- It’s the perfect flooring choice for busy households
And that’s just the start!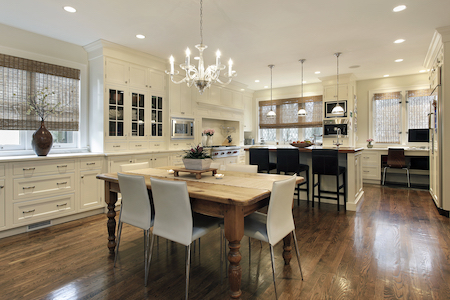
Like other flooring choices, if you’ve decided to install engineered wood, your goal probably includes a desire to keep them looking new for as long as possible. It’s a big investment; why not do what it takes to make them look as good as possible for as long as possible?
The good news is you’ve chosen well. Engineered flooring will stand the test of time if you do just a few things.
What is the best way to clean engineered wood floors?
One of the reasons homeowners love engineered wood is because it’s so easy to take care of. It has the look and feel of real hardwood, yet it’s more durable, which makes it even easier to clean.
Keep a vacuum handy. Then run over your engineered wood floors regularly with a vacuum picking up dust, debris, tiny crumbs, and other small objects your family tracks in or drops. Be sure the vacuum was created for wood floors. If it has a beater bar or a power rotary brush head, it has the potential to damage the surface finish.
You can also use a soft cloth to wipe away daily spills. The key is ensuring you don’t dig harsh objects into the surface. Avoid using brooms with stiff bristles, or applying pressure to sweepers that can push dirt and debris across the surface area. Once a floor is damaged, it can be difficult to repair.
We also advise to stay away from harsh chemicals when cleaning your floors. A lot of cleaning products on the market today can do more harm than good. A simple combination of vinegar and water makes an excellent cleaning solution. Just be sure your rag isn’t saturated when you apply it to your engineered wood, and it dries from the surface quickly. Moisture can be a big problem for engineered wood floors.
What does moisture do to engineered wood flooring?
There are two big problems that can shorten your engineered wood flooring’s life. The first is scratches and dents that impact the surface of the flooring. The second is damage from moisture and humidity.
Most Colorado homeowners think moisture and humidity isn’t a problem here in our dry environment. But every home has a potential problem of creating too much humidity, and having trouble with things like mildew, mold, and warping.
Think about our seasons for a minute. In the heart of the winter, it can get bitter cold outside. With temperatures falling below zero degrees, your furnace kicks into overtime. This dries out the inside of your home, including your flooring. Then in the summer, the rain begins. You introduce cooled air from your air conditioner. All of that can cause your flooring to expand and contract.
If your flooring was installed correctly, there is room for expansion. If not, there is potential for your flooring to warp and buckle.
The easiest way to prevent this is by monitoring your humidity levels. Invest in a humidifier if necessary. Avoid excessive water on your floors. Clean up spills immediately. If there is risk for spills, such as in the kitchen, invest in area rugs to keep spills to a minimum.
Can you steam clean engineered wood floors?
This is a popular question we get about engineered wood flooring. In one word, the answer is: no.
Steam cleaners are designed to clean flooring using two things – steam and water – two things that aren’t good for engineered wood flooring. The steam can force water into the cracks and below the surface layer, potentially causing more damage than any other type of cleaning.
If your flooring needs a deep cleaning, start by using a product approved by the manufacturer of your floors. Check on their website for recommended solutions, or give us a call. We’re happy to make recommendations.
If your engineered wood looks dingy and dirty even after cleaning, it might be time for refinishing. While engineered wood can’t always be refinished like traditional hardwood planks, a high quality engineered plank may have the potential to be sanded and refinished more than once. Again, check with your manufacturer for guidance.
Can you polish engineered wood floors?
An engineered wood floor is different than traditional hardwood. Because the planks are built with different layers, it can’t be sanded down like conventional planks. The wood veneer layer is usually ⅛” to 1/16” thick, so sanding it down has the potential to destroy the look of the flooring. While buffing and polishing may be an option, keep in mind that you will be reducing the top layer of the product. Always check with manufacturer guidelines first. When in doubt, don’t impact the top layer of the engineered wood.
Are there other ways to protect engineered wood floors?
Want to make your rooms look fantastic, complement your decor, and protect your wood planks too? Consider area rugs for both protection and aesthetics.
While homeowners use engineered wood to create a luxurious atmosphere, area rugs help make it even better. In the places where you spend the most time, they can help protect the finish from scratches, dents, and moisture, ensuring your flooring looks good for years to come.
However, you can’t throw down any rug and expect it to work.
Start by cleaning the area thoroughly before you lay down a rug. If you place the rug over dirt particles, debris, or oil, it can cause irreversible damage that will be noticeable after you remove the rug.
Think functionality first. While a fluffy rug might be the perfect way to add warmth to a bedroom, you’ll want to keep a low profile in high traffic areas to prevent falls.
Be sure to use non-slip rug pads underneath. Never use rubber backs, as they can damage the finish on the floor. Choose a rug pad specifically made for your flooring material. This will help avoid friction between the rug and the flooring, and prevent movement that can damage both your floors and cause a tripping hazard for your family.
Then, let your design ideas flow. There are many different types of rugs on the market today. You’ll find one perfect to create the look and feel you’re trying to achieve.
One of the reasons people love engineered wood flooring is because it gives you the look of traditional hardwood, but in a more durable package. If you’re in the market for engineered wood floors, stop by today and see our complete line. You’ll love the way it looks in your home.
This post appeared first on https://pro-flooring.com