You love your hardwood floors. But maybe you have a room where you want something a bit different. Why not give carpet tiles a try?
Carpet tiles have long since been a favorite in the commercial sector, with carpet tiles representing 60 percent of the commercial carpet market. But as people continue to use them in office settings and find out how beneficial they are, they are putting them into their homes too.
Why? Because they’re so versatile! Once you give them a try, you’re going to find many uses for them throughout your home.
What are carpet tiles?
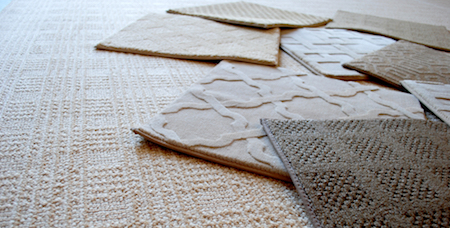 Carpet tiles are, as the name implies, squares of carpet that can be fit together inside your room. They usually are cut to 24 x 24 inches, or 18 x 18 inches square, but with their popularity, you’ll find them in all sorts of sizes.
Homeowners love them because they are easy to handle and care for in do-it-yourself fashion. If you buy broadloom carpet and try to install it yourself, you can face a variety of problems. It takes talent to install, hide seams, stretch, and tack into place.
Not so with carpet tile. Because they are easy to handle, virtually anyone can install them in minutes.
Want a few tips on how to use them inside your home? Read on.
Install them easily
One of the best reasons to use carpet tiles throughout your home is because they are super easy to install. As a do-it-yourselfer, it’s an easy project to take on.
Maybe you’ve been watching the home improvement shows on television. Maybe you’re just looking for a way to make your room stand out without spending a lot of money. Carpet tiles can be one of the best solutions. Just make sure the subfloor is prepared correctly. Then select your tiles, ensure you have enough for the size of your room, and install them. It’s literally that easy.
Add a punch of color to any room
Most homeowners like a more subdued, natural color in the main living spaces of the home. But there’s always one room where you want the freedom to express yourself. Maybe a playroom, a craft room, or a music room. Maybe you have a creative child who’s dying to bring wild colors into their space. Carpet squares are the way to do that easily.
What’s even better is the fact that they are as easy to take out as they are to put in. If your creative genius mixes up the colors, then decides they want to change things up, you can do so easily. It’s a great way to help build their confidence and let them have fun with their newfound decorating skills.
Avoid labor costs and replacement issues
Carpet tiles can be less expensive than many other flooring options you may look at. What’s more, because you can do it yourself, you can save on labor and installation costs too. And because carpet tiles are laid directly onto the subfloor, you won’t have the added expense of carpet pads either. It truly can be a fun way to save money and create a unique space you’ll love.
Carpet tiles are perfect for high traffic areas where spills and other messes may be a problem. How about installing them in a wine cellar? You won’t have to worry about dropping a bottle or spilling when you cork your favorite blend. They are easy to clean. And if you do stain an area, just lift up the tile and put a new one into place. For that reason, it’s a good idea to order a few extra, to replace damaged tiles as they happen.
Put them in the most high traffic areas of your home
Have you watched the way your kids tear up their playroom? They build all kinds of wild and creative settings as they imagine the day away.
Of course, that snack they snuck up into the playroom often gets entangled in the action. Ground up cookies, spilled juice, and even the occasional melted candy bar can really pack a punch on your flooring.
But with carpet tiles, you don’t have to worry about the mess. It’s easier to clean up as they occur. And if something happens that you can’t remove, just replace the tile, and it’ll look as good as new.
Worried about not having enough tiles or not having the colors match? Why not mix and match? Select several different colors all in one similar range. Then piece them together, so the colors interweave. If you run out of a color, you can always shop for more, never worrying about how they will integrate with each other. Every new color simply adds to a new look.
Carpet tiles are durable
Home office work is rising every year. Over 3.7 million workers telecommute at least part of their workweek. Over 15 million are self-employed. That makes home offices not just a convenience, it puts them more in demand than ever before.
Yet what flooring works in a bedroom or living space doesn’t necessarily work for office functionality. That plus carpet is hard to roll through with an office chair. Yet its the perfect environment to get creative and install carpet squares instead.
Stay subtle and blend it with the rest of your home’s decor. Play up the color of your company brand. Or make it uniquely your own, to provide motivation through color as you work through your busy days.
Avoid seams
Do you have an oddly shaped room? Do you always have to buy a lot more flooring just to make it work? That’s a lot of waste.
If you select wall to wall carpet, it most likely comes in 12 foot widths. Yet how many rooms are perfectly 12 feet? Playrooms and home offices are often tucked into corners of the home. Homeowners are brilliant at being able to create space from nothing. Storage closets, wine cellars, game rooms and more can all be added creatively to give you exactly what you want from your home.
And once you have your creative juices flowing, with carpet squares, you’ll never have to worry about having a seam in the worst place possible. Or pay for extra carpet that will never be used, just to piece it together into a corner. Just tuck the carpet square in, cut it to size, and press it into place.
Clean up for health
Some of the most popular rooms in your home are also the messiest.
- The playroom where your kids grind in the dirt
- The gameroom where you spend your nights and weekends
- The craftroom where paints, clays, and more can linger forever
And once the dirt and grime are in place, it can impact your health as well as be an unsightly mess.
The EPA has stated that indoor air quality is often worse than outside air. Since carpet tiles have lower pile, they trap less dirt, and are easier to clean. That means they can be a better alternative for creating a more eco-friendly living space in your home.
Give you better water protection too
Even carpet tiles are still carpeting; they will never stand up to standing water. But when you compare carpet tiles with wall to wall carpeting, you will find they stand up to moisture better over time. They’re easier to clean, meaning you can clean up that spill quickly and not have it impact the fibers. Because there isn’t a carpet pad, moisture won’t seep through. And if you do sustain damage, it’s easier to correct the problem by replacing individual tiles.
Are you ready to install carpet tiles in your home? We can help. Stop by today and see our complete selection, and find one perfect for the look you’re trying to create.
This post appeared first on https://pro-flooring.com